How To Move An Approval Process from Sandbox to Production in Salesforce
Step by step process on how to move your Salesforce approval process from sandbox to production and some of the pitfalls to avoid.
Firstly, what’s an approval process?
In a nutshell, an approval process automates how your records are approved within Salesforce.For example, let’s assume you have 3 stages of a registration process and at each stage you require certain bits of information from a customer before they are moved onto the next stage of the process. To ensure that your sales reps gather this data before the record moves onto stage two, you could utilise an approval process as a means to to control what records are approved based on certain criteria being met/unmet. Another example, may involve a manager of a company that wants to approve any discount that is over 20% on a certain purchase value. Again, an approval process would be perfect in this situation.Once you have setup your approval process, run your tests and you’re happy with your process, it’s time to utilise Salesforce Change sets to get the approval process you have created in Sandbox over to your live production account. (Note: its best practice to use your sandbox account when testing new processes or applications)
How to move an approval process from sandbox to production?
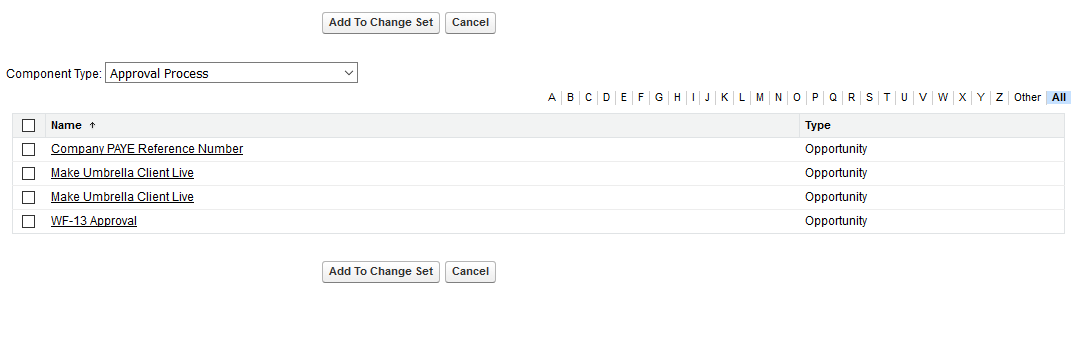
1. Click on your setup 2. In the quick find/ search box type ‘change sets’ 3. Click on ‘Outbound Change Sets’ 4. Click on ‘new’ 5. Give your change set a name and description (e.g. Registration Approval Process) 6. Next click on ‘Add’ under Change Set Components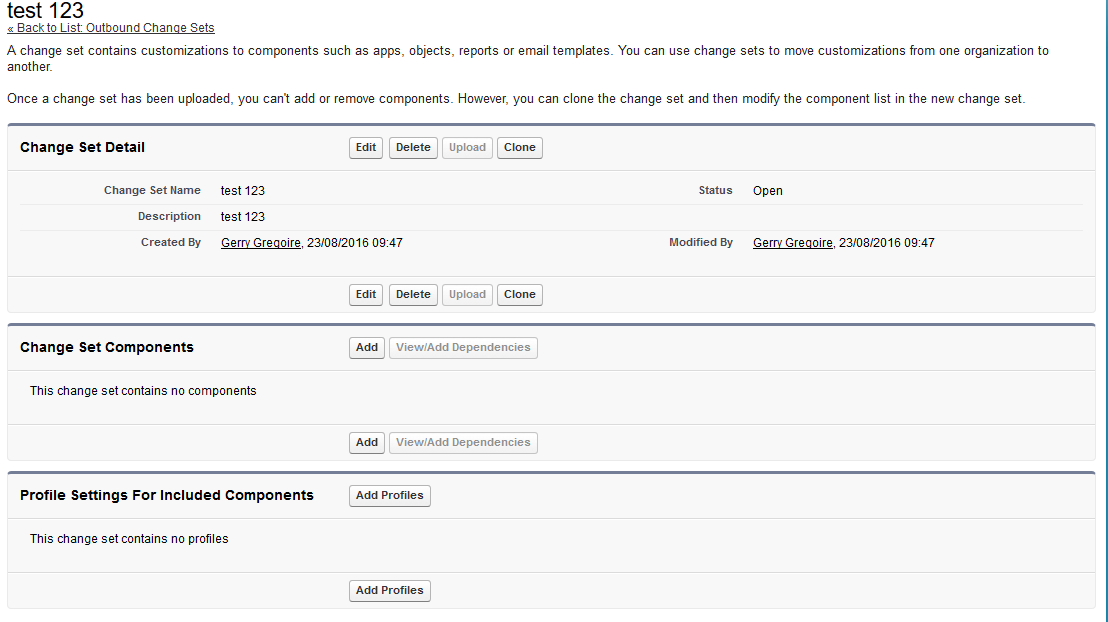 7. Select ‘Approval Process’ from the component type drop down list. You should then be able to see your approval process listed. Check the box next to the relevant approval process you want to move and click on ‘Add To Change Set’ button.
 Don’t forget this next important step as it will save you huge amounts of time by getting it right first time.
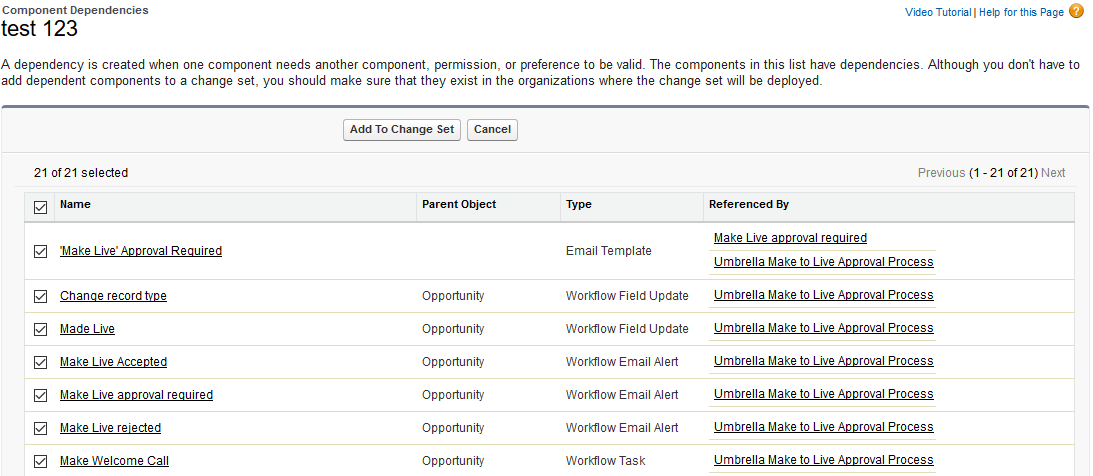
8. Click on ‘view/add dependencies’ button. You will be directed to a page, which lists all the dependent components to make the approval process work.
Don’t forget this next important step as it will save you huge amounts of time by getting it right first time.
8. Click on ‘view/add dependencies’ button. You will be directed to a page, which lists all the dependent components to make the approval process work.
Example: Your approval process may include a bunch of workflow e-mail alerts, field updates or tasks. The approval process only really works with these components and so its important that you include these within the change set too, If you don’t do this, you will come across errors when you try to deploy your approval process in your live Salesforce production platform.9. Select all the dependent components required and click ‘Add To Change Set’
 10. If you configured profile settings into your approval process you can also include these too. Click on ‘Add profiles’ if this is the case.
Time to deploy your approval process…
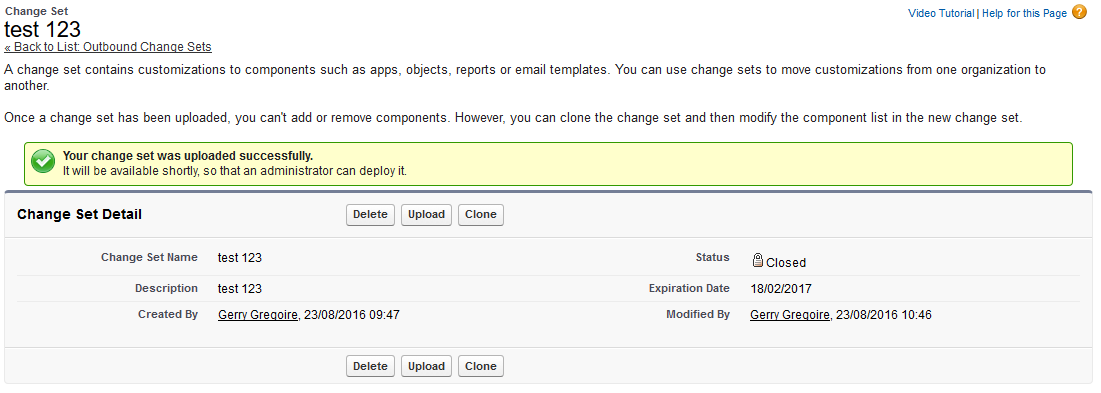
11. Finally click on the ‘Upload’ button 12. Select your production account and continue. You should see an upload successful notification
Jump into your live production org
1. Go to setup area and in the search type ‘change sets’ and click ‘inbound Change Sets’ 2. You should see your change set under ‘Change Sets Awaiting Deployment’ (Note: If you have a large number of components in your change set, it can take up to 30min before they are all transferred over)
3. Click on the name of your change set
4. Choose whether you want to validate or deploy your process (Validating your approval process allows you to view the success or failure messages you would receive with actual deployment).
5. If you selected ‘Deploy’, your approval process will start being deployed into your live org. You will see a success notification and you are good to go!
Finally, I would recommend you go and check that your approval process is all setup as you configured it in Sandbox. You should have done all the testing needed, However, I always like to run several additional tests in the production platform to ensure that everything is running smoothly.
(Note: If you have a large number of components in your change set, it can take up to 30min before they are all transferred over)
3. Click on the name of your change set
4. Choose whether you want to validate or deploy your process (Validating your approval process allows you to view the success or failure messages you would receive with actual deployment).
5. If you selected ‘Deploy’, your approval process will start being deployed into your live org. You will see a success notification and you are good to go!
Finally, I would recommend you go and check that your approval process is all setup as you configured it in Sandbox. You should have done all the testing needed, However, I always like to run several additional tests in the production platform to ensure that everything is running smoothly. Like it? Share it